Saturday, March 27, 2010

Draw on That—Day Nine
Filling it in

Today's older class repeated what we did the younger class—we started with one of my favourite, fun warm-up exercise—The Scribble Challenge! This fun activity for all ages that is great for developing our problem solving ability. Have I ever mentioned how I even have had my parent's try this one?

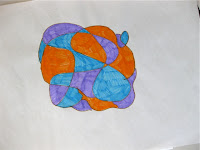
Once again, here is what we did—we started by using a marker of any colour, and made a large scribble on paper. Next, we filled in the spaces of our scribbles while trying our best to follow these two rules:
  1. Use only three colours. 
  2. The same colour cannot share a "wall".
Check out some of the fun results—


Staying on the theme of outlines and fills as created by our scribble drawings, we then moved on to today's project—TRACING.

I'll say it again, tracing rocks!  Tracing an image can help us create muscle memory, to practice new and intricate lines and forms that we might never have drawn freehand and to train ourselves to "draw what we see and not what we think we see". It  It can also create the foundation for a drawing to allow us to focus more on details like shading and texture.

For today's lesson, I used the beautiful, large windows that we have at our location. For each student, I taped up a printed photo of their choice. Student were to choose from pictures of buses or flowers. Over each photo, I taped a clean white sheet of paper.

The interesting thing with this older group is that most chose the flowers with more curved lines and  less small details. Some did try the buses later but those curves and organic flower shapes were just more appealing than those straight structured lines of the buses, today anyway.


After tracing, it was detail time! All colours of marker and pencils too were pulled out and the children were set free to decorate as they saw fit. Students applied all kinds of different textures and colour combinations. With these older kids, we also see some interesting attempts at shading and creating depth through colour variation (check out the use of the different greens in the pics below).

Draw on This—Day Nine
Scribbles and Tracings

For today’s class we started with one of my favourite, fun warm-up exercise—The Scribble Challenge! This fun activity for all ages that is great for developing our problem solving ability.

This unique challenge also helped me to see the different personalities in the class. The free thinking creatives seemed to have more fun with choosing colours and fun shapes where other students had more fun analyzing the puzzle aspect of this exercise. And of course there were others in the middle, not unlike myself, who love both aspects of this exercise.

We started by using a marker of any colour, and made a large scribble on paper. Next, we filled in the spaces of our scribbles while trying our best to follow these two rules:
  1. Use only three colours. 
  2. The same colour cannot share a "wall".
Check out the cool results! There was quite the variety of styles!


After we were fully warmed up with this exercise of creating outlines and fills, we then moved on to today's project—TRACING.

Tracing is such a valuable tool! I have heard many artists refer to tracing as "cheating" but I don't buy that for a second. Tracing an image can help us create muscle memory, to practice new and intricate lines and forms that we might never have drawn freehand and to train ourselves to "draw what we see and not what we think we see". It  It can also create the foundation for a drawing to allow us to focus more on details like shading and texture.

For today's lesson, I used the beautiful, large windows that we have at our location. For each student, I taped up a printed photo of their choice. Student were to choose from pictures of buses or flowers. Over each photo, I taped a clean white sheet of paper on which each student would use markers to trace the image behind it.

After tracing, it was detail time! All colours of marker were now pulled out and the children were set free to decorate as they saw fit. There was quite the array of ideas here! Different textures and colour combinations.


Thursday, March 25, 2010

This and That—Day Ten:
The Human Form


Sadly, tonight was our last class.

As a finale to our ten week course, tonight we looked at the full human form. Using the wooden mannequin as a model, we were able to review basic human proportions and how to use a mannequin as a guide for drawing people.

We started with some fast warm ups where we experimented with using different types of lines, like spirals, to capture a human form, mass and position. Drawing in this way is a great way to warm up and to capture a form quickly while giving your drawing a bit of depth. Check out how these spirals can help define the three-dimensional shape of the human figure (see picture below).

I also challenged my students to try to capture their mannequins with contours—by only drawing the outlines of shapes with no shading or fills. This exercise is great for training the eye and lovely for creating definition.


For our main exercise we proceeded to draw with slower deliberate detail. With pencils in hand we measured proportions, blocked in shapes and rendered our drawings of our model. Below is my "in progress" sample with all lines blocked in and the shading started.


With our course complete, I wish to thank all my lovely students for their participation. I had a blast getting to know you and sharing this experience with you. Thank you for your bravery in your willingness to try new things. You all have inspired me and I look forward to seeing what you can do in the future. Keep drawing!!

Wednesday, March 17, 2010

March Break

Just a reminder that there are NO CLASSES this week due to the March break holiday (March 15–21).

Saturday, March 13, 2010

Draw on That—Day Eight
More Contours

Like my younger class this morning, today I challenged my older students with BLIND CONTOUR DRAWING while looking at an array of objects. We again had ice cube trays, the wooden drawing mannequin, shoes, a lantern and a spray bottle.
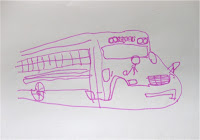
Again, blind contour is using lines to draw the outside edges of the shapes seen in an object WITHOUT looking at your paper. This is a great exercise to practice looking at objects and focusing in on truly seeing that object and not just drawing what we think it should look like. The result often looks like a spaghetti mess.

Like my younger class this morning, some of our results today are a little too good. I have cheaters again! Although, I must admit that when I do blind contours, I am extremely tempted to look at my paper too! :-) Here are the blind contours from this class today—


After not allowing my students to look at their paper while they drew, I released them from their torture and asked these student to try real contour. This time they could look at their paper.

Drawing contour drawings that have good proportions can be very challenging! These students had to practice much patience and were encouraged to slowly follow the edges of these objects with their eyes and to use their pencils replicate those same paths on paper.


For those students that finished a bit early or who needed a break from contours, I demonstrated my scribble method to draw trees. This was a nice release from the strict style of contours as we could go a bit wild with our disorderly scribbles. Using our array of pencils, I used dark and light values to give my tree a bit of depth as I demonstrated the scribble tree technique—


Here are a couple of the fun results from our students.—